
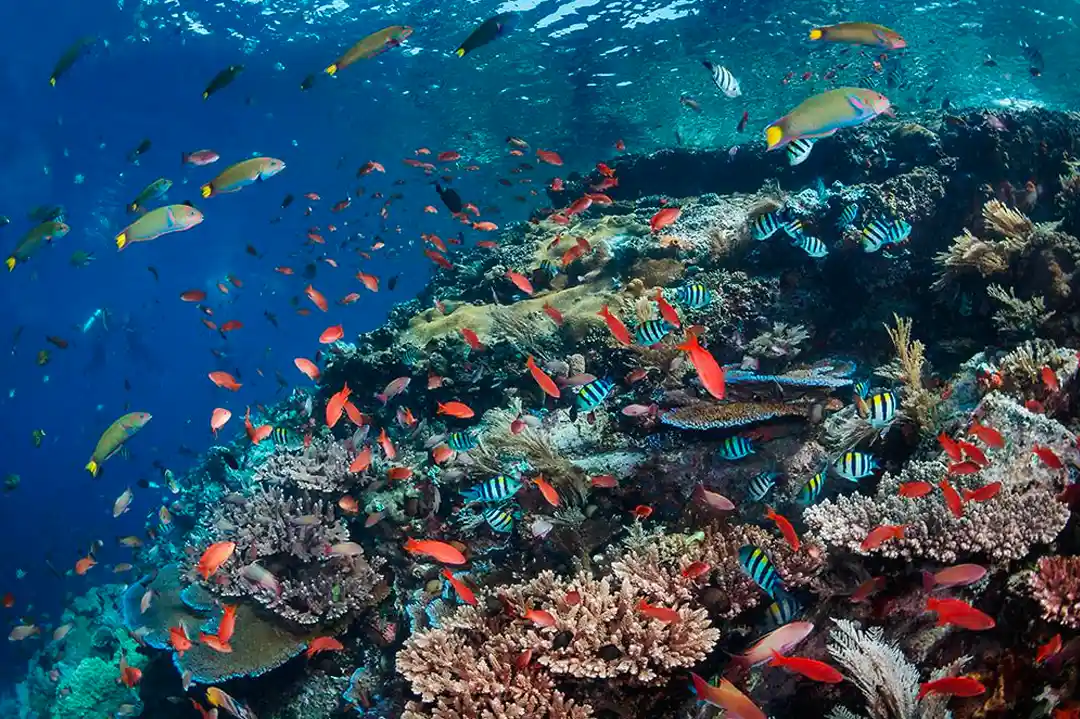
Batu Bolong is a small rocky pinnacle in central Komodo, repeatedly described by divers as Komodo’s most famous reef — a “jewel in Komodo’s crown” whose pyramid-shaped walls are absolutely packed with fish and coral from the surface down past 30m. For photographers, that density is both the appeal and the challenge: strong, sometimes downward currents mean you’re often shooting one-handed while finning to hold position, so knowing your settings before you back-roll in matters more here than at almost any other site in the park.
This guide breaks down what actually works at Batu Bolong — wide-angle vs macro strategy, exposure settings for the light you’ll get at different depths, and how to read the current so you’re composing shots instead of fighting the reef. It’s written the way we’d brief a photographer joining a komodo island liveaboard before their first Batu Bolong dive.
Still comparing boats? Start with our complete Komodo liveaboard packages overview, check transparent Komodo liveaboard prices by duration, or take the whole boat with a private phinisi charter.
Why Batu Bolong Rewards (and Punishes) Photographers
The pinnacle’s shape is what makes it special. Because it rises steeply from deep water into a compact footprint, fish life concentrates in a way few other Komodo dive sites can match — anthias clouds thick enough to obscure the reef behind them, surgeonfish and sweetlips holding in loose schools, and a resident bumphead parrotfish school that’s been sighted around 25m. Sharks, turtles, napoleon wrasse, and the occasional dolphin passing overhead round out a site list that reads more like a highlight reel than a single dive.
The catch is current. Batu Bolong sits in a channel that funnels tidal flow, and that same flow is what keeps the reef so fish-rich — strong, sometimes downward currents are the trade-off for the biomass. Dive operators often limit which side of the pinnacle you approach depending on the day’s conditions, and it’s genuinely possible to be pinned against a swim-through or swept past a shot before you can frame it. Photographers who treat this as a leisurely macro crawl are setting themselves up to miss the site; the ones who plan their positioning around the current get the best images in the park.
Depth Profile and What to Shoot at Each Level
| Depth zone | What you’ll find | Photography approach |
|---|---|---|
| 0–10m (shallow reef top) | Dense soft coral, anthias swarms, sunball backlighting | Wide-angle with strobes down for fill; shoot upward into ambient light for silhouette-and-color shots |
| 10–25m (main wall) | Bumphead parrotfish school (~25m), sweetlips, surgeonfish, sharks and turtles passing | Wide-angle fisheye or rectilinear; pre-set exposure and wait for schooling fish to move into frame rather than chasing them |
| 25–35m (deep reef, deep-certified only) | Larger pelagics, napoleon wrasse, occasional dolphins overhead | Fast, opportunistic shooting — limited bottom time means pre-dialed settings matter most here |
| Crevices & overhangs (all depths) | Octopus, morays, boxfish | Macro or close-focus wide-angle; approach slowly and let the current, not your fins, do the final positioning |
Best Camera Settings for Batu Bolong
The wall’s fish density and current mean you generally want to be shooting fast and wide rather than hunting for macro subjects one at a time. Start here and adjust for the day’s visibility:
- Lens choice: Wide-angle (fisheye or 16mm rectilinear equivalent) is the priority lens for Batu Bolong — the schooling fish, wall texture, and swim-through structure all favor wide framing over macro. Save a macro pass for a second dive if conditions allow.
- Shutter speed: 1/125s–1/250s minimum. Current means you and your subjects are both moving; a slower shutter will blur schooling fish and your own drift.
- Aperture: f/8–f/11 in good midday light for depth of field across a busy reef scene; open up to f/5.6 in lower light or deeper water where strobe power is doing more of the work.
- ISO: Start at 200–400 in the shallows; push to 400–800 past 20m as ambient light drops, rather than dragging your shutter speed down.
- Strobe positioning: Wide, angled outward from the dome rather than straight in, to avoid backscatter in what can be busy, particulate-rich water when current stirs the reef. Pull strobes back slightly on days with lower visibility.
- White balance: Manual white balance set at depth if you’re shooting without strobes for ambient-light shots in the shallow zone — Batu Bolong’s shallow coral color is worth capturing without artificial light on a bright day.
Reading and Working With the Current
Current strategy at Batu Bolong isn’t optional — it’s the difference between a productive dive and a wasted one. A few practical rules:
- Get the dive briefing seriously. Your guide will call which side of the pinnacle to approach based on that day’s current direction — this changes dive to dive, so don’t assume yesterday’s plan applies today.
- Use the reef, not your fins, to hold position. Find a low, current-sheltered spot behind a coral head or rock to brace and compose a shot rather than finning hard against open water — better for your air consumption and for the reef.
- Pre-set your exposure before the strong sections. If you know a stretch of the dive will be fast-moving, dial in your settings during a calmer moment so you’re not fumbling dials while drifting.
- Respect downward current warnings. Batu Bolong is known for occasional downward pulls — if your guide signals to move away from a specific area, that takes priority over any shot.
- Advanced certification is strongly recommended. This isn’t a site to learn current management on; come with solid buoyancy and drift experience so your attention can stay on framing, not survival.
Ready to dive Batu Bolong? Whether it’s a stop on the 3D2N share-cabin open trip or a private charter built around a photography-focused itinerary, it’s bookable directly through Komodo Luxury Open Trip — live schedules and cabin availability. WhatsApp +62 811 3823 875 or email [email protected].
Building Your Batu Bolong Shot List
If you’re only diving Batu Bolong once on your trip, aim for a mix rather than chasing a single “hero” shot:
- Wide reef-scape from the shallow top — captures the pyramid shape and coral density that gives the site its reputation.
- Schooling fish against blue water — anthias or surgeonfish schools shot from below, angled up toward the surface for depth and light.
- The bumphead parrotfish school around 25m, if your dive plan and bottom time allow reaching that depth.
- A macro detail shot from a crevice or overhang — octopus, moray, or boxfish — for contrast against the wide-angle work.
- A current-action shot — divers hooked in or braced against the reef, which tells the story of what makes this site distinct from calmer sites like Manta Point.
Batu Bolong sits in central Komodo alongside sites like Castle Rock and Tatawa Besar, and most itineraries schedule it during the April–October window when central Komodo conditions are calmest and visibility is at its best — worth requesting explicitly if photography is your priority for the trip. For the surface-level counterpart to a photography-heavy dive day, many guests pair a Batu Bolong dive with a golden-hour stop at Padar Island or Pink Beach on the same itinerary.
Frequently Asked Questions
Why is Batu Bolong famous?
Batu Bolong is widely regarded as Komodo’s most famous reef — a small pinnacle whose pyramid-shaped walls are packed with an unusually dense concentration of fish and coral for such a compact site. Anthias clouds, a resident bumphead parrotfish school, sweetlips, sharks, turtles, and napoleon wrasse all show up on a single dive, which is rare even by Komodo’s high standards. The same current that concentrates that marine life also makes it one of the park’s more demanding dives.
Is it suitable for beginners?
Advanced certification or equivalent drift-diving experience is strongly recommended. Batu Bolong’s currents can be strong and sometimes downward, and the site is often dived one side at a time depending on conditions — not the setting to build current-management skills for the first time. Divers with solid buoyancy control and drift experience will get far more out of it, and more comfortably, than those still building confidence in moving water.
Best camera settings?
Favor wide-angle over macro, since the site’s density of schooling fish and wall structure suits wider framing. Start around 1/125s–1/250s shutter speed, f/8–f/11 in good light, and ISO 200–400 in the shallows rising to 400–800 past 20m. Angle strobes outward from the dome to reduce backscatter, and pre-set exposure before entering faster-moving sections of the dive so you’re not adjusting dials mid-drift.
What’s the current like?
Strong, and sometimes downward — this is the defining feature of the site. Current direction and strength change from dive to dive, which is why guides typically brief which side of the pinnacle to approach on the day rather than following a fixed plan. It’s a genuine current dive, not an occasional current dive, so come prepared to use the reef for shelter and follow your guide’s positioning calls closely.
How deep does the wall go?
Typical dive profiles run roughly 10–25m along the main wall, with the deep reef extending down to 30–35m. Some dives start as deep as 35m for divers with deep certification, where you’re more likely to see larger pelagics and napoleon wrasse. Most of the site’s signature marine life — including the bumphead parrotfish school — is concentrated in the 10–25m range, which is where most photography time is best spent.
Planning a photography-focused Komodo trip? Our team can build a private charter around Batu Bolong and Komodo’s other current-fed pinnacles, or you can join the 3D2N share-cabin open trip — both are bookable directly through Komodo Luxury Open Trip — live schedules and cabin availability. WhatsApp +62 811 3823 875 or email [email protected].